Technical Assistance
Local call: 418-689-5060
Toll free: 1-833-689-5623
Email: support@jobel.ca
Foreword
Under section 61 of the Fisheries Act, commercial fishers are required to submit their catch information to Fisheries and Oceans Canada (DFO) using a logbook. In 2007, DFO began a long process to replace the paper logbook with an electronic version. An electronic logbook is a software program used on board vessels that collects information on catch, fishing effort, and other data.
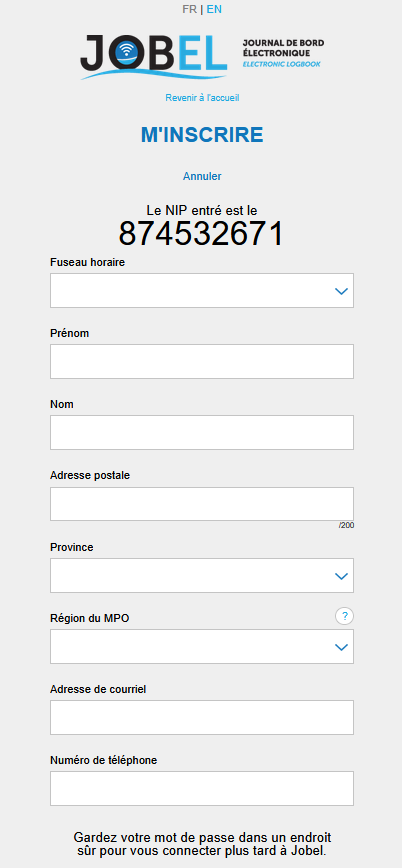
What is JOBEL?
JOBEL is a web-based solution that allows commercial fishers to complete an electronic logbook at sea without the need for an internet connection*. Once on land, they can then transmit their fishing data to DFO via the web from a smartphone, tablet, or computer.
Designed by fishermen, for fishermen, JOBEL is software:
- Simple and easy to use, ensuring reliable data.
- Responsive design that works on a variety of smartphones, tablets and computers.
- Works offline (not connected to the internet) when entering information* and requires a wireless (Wi-Fi), cellular, or satellite internet connection to send data.
- The data is sent by the fisherman to the DFO without having to use a third party to enter it.
* Registering with JOBEL and subscribing to a fishing module requires an internet connection, as the software is internet-based. However, once you have registered and subscribed to a module and opened it on the web from your device (smartphone, tablet, or computer), you can access it from that same device in "offline" mode, without an internet connection.
Legal notice and privacy policy
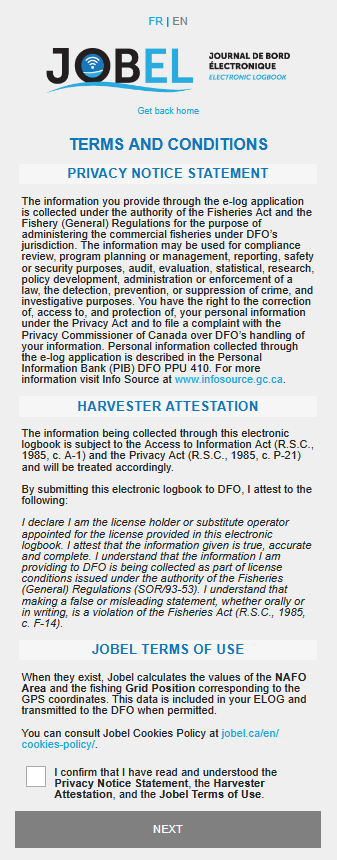
Legal notices and privacy policy- By using the websites www.jobel.ca, app.jobel.ca and the JOBEL electronic logbook software, or by submitting information to JOBEL via the web or any other means, you agree to the collection, transfer, and use of this information as described in this notice.
- By using the websites www.jobel.ca, app.jobel.ca and the JOBEL electronic logbook software, or by submitting information to JOBEL via the web or any other means, you agree to the terms of the legal notice.
-
Privacy Policy
The information you provide using the electronic logbook client application is collected under the authority of the Fisheries Act and the Fishery (General Provisions) Regulations for the purpose of administering commercial fisheries under the jurisdiction of Fisheries and Oceans Canada (DFO). This information may also be used for compliance verification, program planning or management, reporting, safety or security, auditing, evaluation, statistics, research, policy development, law administration or enforcement, crime detection, prevention, or suppression, and investigation. Under the Privacy Act, you have the right to correct, access, and protect your personal information. You also have the right to file a complaint with the Privacy Commissioner of Canada regarding the handling of your information. The personal information collected by the electronic logbook client application is described in Personal Information Bank (PIB) DFO PPU 410. It can be viewed and verified for accuracy. For more information, visit the Info Source website at www.infosource.gc.ca. -
Personal and other confidential information
Electronic logbook data transmitted through JOBEL is confidential and subject to the provisions of applicable federal and provincial laws. Therefore, electronic logbook data is protected against unauthorized disclosure and access by third parties other than DFO and the fisher from whom it originated. Disclosure of or access to data by a third party other than the fisher from whom the data originated must be authorized in writing by the fisher and DFO. However, access to electronic logbook data is permitted when required by a JOBEL technical support person or a person working under their supervision to diagnose and resolve hardware or software problems related to the ELOG client. The electronic logbook provider, JOBEL, has a strict confidentiality policy regarding the use of personal and sensitive information received, including:- Personal information that you provide directly in the electronic logbook;
- Personal information provided by Fisheries and Oceans Canada for the proper operation of the electronic logbook.
- Confidential business information, including all data contained in the catch reports and metadata related to the use of the electronic logbook. The JOBEL provider agrees, regarding the client's confidential information to which it has access in connection with the use of JOBEL and the information provided in accordance with section 61 of the Fisheries Act and section 22 of the Fishing Regulations (General Provisions), and subject, but not limited to, laws such as the Access to Information Act and the Privacy Act, to: a. Not rent, sell, give away, or use the information for purposes other than those related to the management requirements of the electronic logbook solution, the needs of Fisheries and Oceans Canada, and the purposes you have requested in writing. b. Preserve the confidentiality of this information with the same degree of care as if it were its own confidential information. c. Only grant access to this confidential information to those of its collaborators who need to know it in the scope of their duties, and only on the condition that these recipients are informed in advance of the confidential nature of the information and are bound by a confidentiality agreement at least equivalent to this commitment. The JOBEL provider may share confidential information with its advisors if they are members of a regulated profession bound by professional secrecy (such as lawyers, chartered accountants, or auditors). JOBEL agrees not to disclose confidential information to any other persons without the prior written consent of the owner of the confidential data and information, and guarantees the confidentiality of this information by all persons to whom it is disclosed. All information communicated in connection with the use of JOBEL is considered confidential information.
-
Information relating to the use of JOBEL software
Information sent to JOBEL when initializing, activating, or adding a module, or even during its use, is only used: (i) to verify the software license status; (ii) for compliance purposes; and (iii) to detect and prevent fraudulent use of JOBEL software. -
Web Use
When a user connects to the Internet while activating, deactivating, updating, or using JOBEL, certain information is transmitted to the JOBEL provider:- Device identification, which is a code generated by a specific combination of electronic equipment and the license to register it;
- The version and name of the device's operating software;
- The version and name of the device's browser;
- Universal Time (UTC + 0) at which an action is taken.
- Cookies and other digital markers Web usage information is used by JOBEL's provider to manage and improve the content and functionality of the jobel.ca website pages and the JOBEL electronic logbook. The Supplier will not access confidential data and information, or any other information stored on JOBEL's servers that is not considered confidential by applicable Canadian federal and provincial laws and regulations, for purposes other than those set out in paragraphs 3 through 6, unless there is specific written consent from the end user on a case-by-case basis identifying the type of data the Supplier may access, the entity authorized to receive the data identified in the written consent, for what purpose, and the duration of the authorized access.
-
Contents of the USER guide
The contents of the JOBEL user guide are subject to change without notice. No part of this guide may be reproduced or transmitted for any purpose or by any means, electronic or mechanical, without the express permission of the Regroupement des pêcheurs professionnels du sud de la Gaspésie Inc. The latter grants the purchaser of an electronic logbook module the right to use JOBEL and this manual for personal purposes. -
Technical Support
JOBEL provides free technical support to the end user authorized by the JOBEL account owner and the JOBEL account owner, including managing changes authorized by the Department of Fisheries and Oceans to capture declarations, and transferring use of a JOBEL account duly authorized by the JOBEL account owner. It is available in French and English, and information services regarding the Services are provided during business hours only. You may wish to consult the resources and information available in your JOBEL account (user guide) and online (FAQs on the JOBEL website, the JOBEL Facebook page, and the JOBEL YouTube channel) before contacting Support. You can obtain the status and history of your contacts with the technical support service. You agree to behave appropriately, cordially, and respectfully in your dealings with technical support. JOBEL reserves the right to no longer respond to your requests in the event of abusive, outrageous, or degrading behavior. -
Access To Information
A JOBEL account holder may request, in writing, free of charge, a complete report of all information relating to their account. However, in the event of a dispute between the Department of Fisheries and Oceans and the user regarding the transmission of fishing data in accordance with the laws and regulations applicable to fishing activities and the reporting of such fishing activities, the costs and expenses associated with the investigations to be conducted by JOBEL employees at your request shall be your responsibility. -
Connection
The Internet and cellular networks present technical hazards (including unreliable connection lines, bandwidth fluctuations, and interruptions) and security risks beyond the control of JOBEL's provider. JOBEL's provider is not responsible for these failures and their consequences, particularly when they result in unavailability and/or discontinuity of the Services. -
Proper use of the Services
You agree to use the JOBEL solution in accordance with the legal and regulatory provisions applicable under the Fisheries Act and the Fisheries (General Provisions) Regulations and in compliance with the technical limitations set out in the current JOBEL user guide. -
Suspension of Services
The JOBEL service provider reserves the right to suspend all or part of the Services in the event of: (a) a risk to the stability and/or security of JOBEL's systems and environments, the Services, and/or the Content, (b) a request from a competent administrative or judicial authority, (c) a notification from a third party, in accordance with the Act to establish a legal framework for information technology (CQLR, c. C-1.1), regarding the use of the Services for illegal activities, or (d) planned maintenance. Such suspension may occur immediately and without notice in cases of emergency, particularly in the situations described in points (a), (b), and (c) above, as well as in cases of illegal or fraudulent use of the Services, use that infringes on the rights of a third party, or more generally, any use that could result in liability for the JOBEL provider. To the extent possible, and subject to judicial or administrative orders, the JOBEL provider will attempt to minimize the impact of the suspension on the normal operation of the Services. Service suspensions do not result in the deletion of Client data stored on your device or on the servers hosting your JOBEL account. In the case of planned maintenance, a service suspension notice will be published on JOBEL's Facebook page or by any other means. -
Evolution of Services
Lifecycle. To meet Canadian federal standards and fishermen's demands for electronic logbooks, JOBEL's supplier regularly updates its fishing catch reporting modules. The fishing modules follow a lifecycle based on the following indicative stages: "General Availability": The date on which a module, a new version, or a new range of electronic logbooks is made available after being qualified by the Department of Fisheries and Oceans Canada. "End of Commercialization": The date on which the commercialization of a module, or a version of a module, is discontinued at the request of Fisheries and Oceans Canada. If available, a new version of the module approved by Fisheries and Oceans Canada will automatically be available on your JOBEL account during the current subscription period for that module. Modification of ordered modules. In this context of evolution, JOBEL's supplier may modify the fishing modules at any time. Certain upgrades may take effect immediately in the following cases:- Urgent developments made necessary in the event of a security risk or legislative development; and
- Modification of Third Party Products.
-
Contents
The Contents of your JOBEL account are your property. JOBEL's provider has no prior control over the content and has no knowledge of it. It does not perform any validation of the content relating to personal information, including the license number, the fisherman's identification number, the boat name, and the boat number. You have full knowledge and control over the Content. You are responsible for recovering Content that has not been transmitted to JOBEL's servers. The JOBEL service provider undertakes, following the termination of the Services, not to retain any copies of the Customer Content except (i) if it concerns data that you must retain in accordance with applicable regulations, or (ii) if it concerns data that the JOBEL provider must retain in accordance with applicable regulations, data referred to in the Personal Information Protection Agreement, and data necessary to defend your rights or the rights holder of JOBEL and/or the JOBEL provider. -
Management of Unauthorized Uses of the Services
You must take the necessary steps to stop any unauthorized use of your JOBEL account. In the event of a Service malfunction, the Customer must report it to Technical Support as soon as possible, providing all necessary information to enable proper diagnosis. If an Incident is reported, Support will conduct investigations to identify the cause and establish a diagnosis. You agree to remain available at all times to collaborate with Technical Support in diagnosing and resolving the Incident, including by providing any additional information and performing all necessary tests and verifications. In order to manage Incidents, the Customer expressly authorizes agents duly authorized by the JOBEL service provider to log into your account, both at the hardware and software levels, and to perform any operations necessary to handle the Incident. This may require your intervention. Technical Support undertakes to keep you informed of the progress of operations. JOBEL's supplier will diagnose the problem by any means necessary. JOBEL makes no guarantees regarding response times or incident resolution within the framework of Support. If JOBEL's supplier determines that the Services are available and in good working order, that the existence of the Incident cannot be confirmed, or that the Incident is not its responsibility, the technical support service will inform you accordingly. Customer Complaints and Support Requests. Any complaints regarding the Services and support requests may be directed to Technical Support by telephone at 1-833-689-5623 from 9:00 a.m. to 4:30 p.m. Eastern Time, Monday through Friday. -
Responsibilities
JOBEL's supplier declines all liability in the event of improper use of the software and failure to comply with the minimum technical requirements. JOBEL's provider disclaims any liability for the use, malfunction, or maintenance of the devices and web browsers you use. It is your responsibility to ensure that the transmission of your fishing data to JOBEL is carried out in accordance with the laws and regulations applicable to fishing activities and the reporting of these fishing activities. JOBEL's provider declines all responsibility in the event that JOBEL fails to receive the user's fishing data within the time limit prescribed by the Ministry of Fisheries and Oceans. You represent and warrant that you have the authority and capacity necessary to use JOBEL for the purpose of reporting your fishing activities.JOBEL's supplier is not responsible for:
- Any act or omission of a third party beyond the reasonable control of JOBEL's supplier.
- Indirect, incidental, special, consequential, punitive, or exemplary damages (including damages arising from your use of JOBEL, whether in contract or tort, whether or not JOBEL's supplier has been advised of the possibility of such damages).
- The return of data and damages related to the loss or alteration of all or part of the content caused by a third party beyond the reasonable control of JOBEL's supplier.
- Damages caused by failures of JOBEL's suppliers, including federal IT services, internet service providers, or communications network operators (such as unreliable connection lines, fluctuating or interrupted bandwidth, etc., including when such failures result in the unavailability of the service).
- The loss, disclosure or fraudulent or illicit use of authentication means to access the customer account or JOBEL services.
- Your use of JOBEL by yourself or a third-party user in a manner inconsistent with this notice, the JOBEL user guide, or applicable laws and regulations.
- Security incidents related to the use of the internet by you or a third party, in particular in the event of loss, alteration, destruction, disclosure or unauthorized access to data provided for in paragraphs 4 and 5 of this notice on or from the internet.
JOBEL's supplier is responsible for:
- The backup of customer data once transmitted to JOBEL's supplier, the implementation and management of a business continuity and/or recovery plan, and more generally of all technical and organizational measures to enable you to continue your business in the event of a major malfunction of the Services likely to impact the continuity of your business and the availability and integrity of its Content and data.
You are responsible for:
- You assume all risks and perils associated with your activities, and you are solely responsible for your use of JOBEL in compliance with this notice, the Fisheries Act, and the fisheries regulations within the framework of the administration of fisheries under the jurisdiction of Fisheries and Oceans Canada, including when your use of JOBEL is by or on behalf of third parties. If you use JOBEL on behalf of third parties, or authorize third parties to use JOBEL and its services, you agree to communicate this notice to them and have it validated before using them. You guarantee JOBEL's supplier compliance with these conditions.
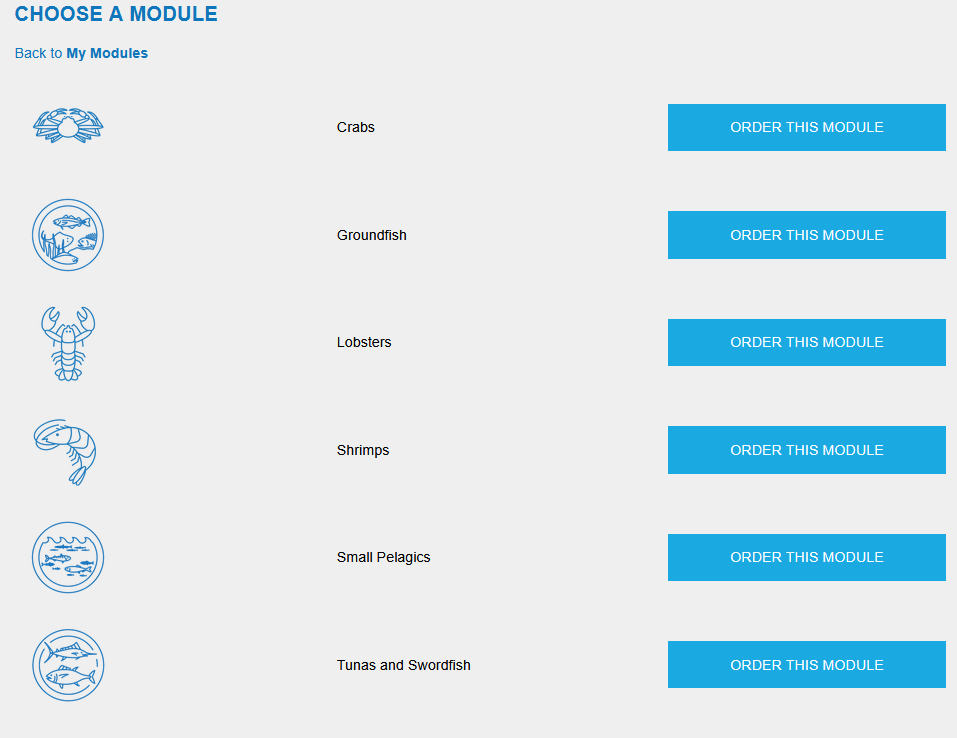
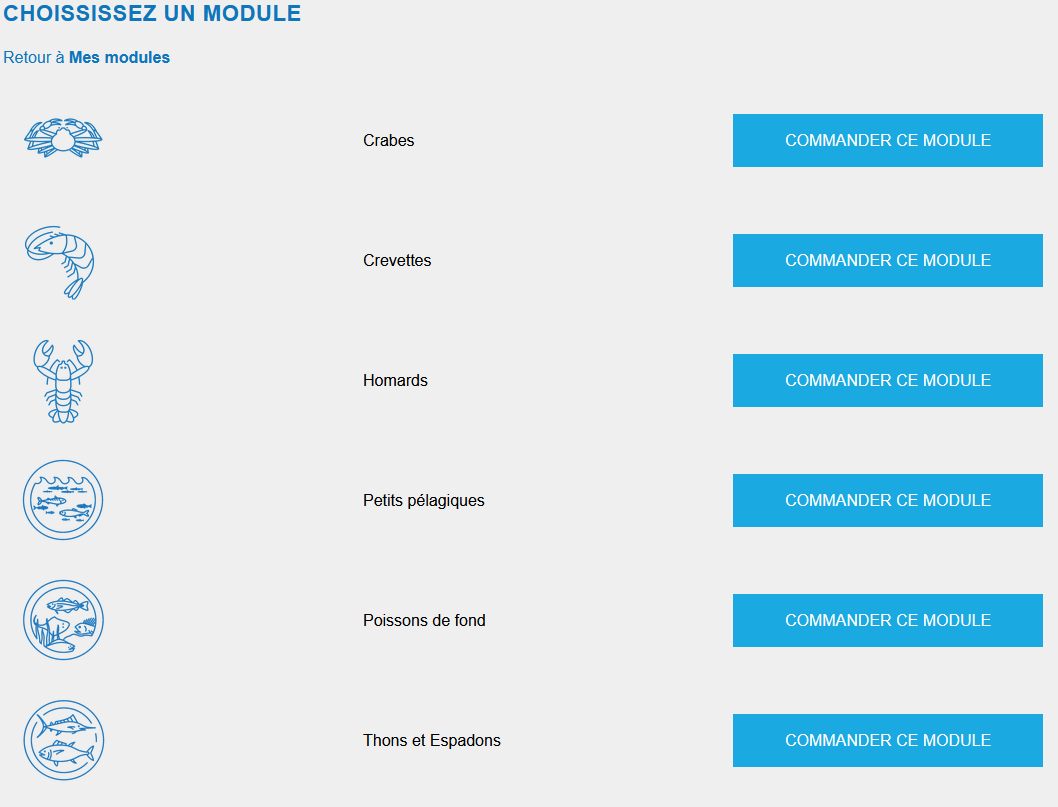
- Review the documentation and available fishing modules in order to select the fishing module that you consider most suitable.
- Ensure that the intended use complies with the laws applicable to the activities carried out in connection with the use of JOBEL.
- The Content, its management and use (including its control, validation, deletion, as well as any measures to protect you against loss or alteration of Content) contained on the device used to report your activities in accordance with the Fisheries Act and applicable regulations, including when they belong to third parties or are used or operated by or on behalf of third parties, and compliance with applicable laws and regulations.
Act of God
Neither Party shall be liable for the non-performance of its obligations – except for the payment of the price of the Services – if such non-performance results directly or indirectly from a case of force majeure as defined in Article 1470 of the Civil Code of Quebec. The Parties declare that the following events shall constitute cases of force majeure: strikes, including strikes by the personnel of one of their subcontractors, acts of vandalism, war or threat of war, sabotage, terrorist acts, fires, epidemics, earthquakes, floods, explosions, and power outages beyond the control of the prevented Party. The prevented Party shall (i) use commercially reasonable efforts to limit the effects of the event; (ii) continue to perform obligations that are not affected by the event; (iii) inform the other Party in writing as soon as possible of the existence, circumstances, impact on the Services and the estimated duration of this event or its effects; and (iv) keep the other Party regularly informed of developments in the situation after the initial information.
-
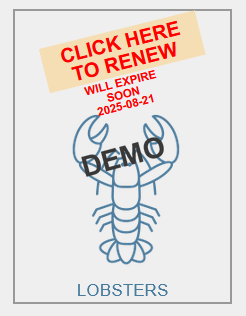
Financial Conditions
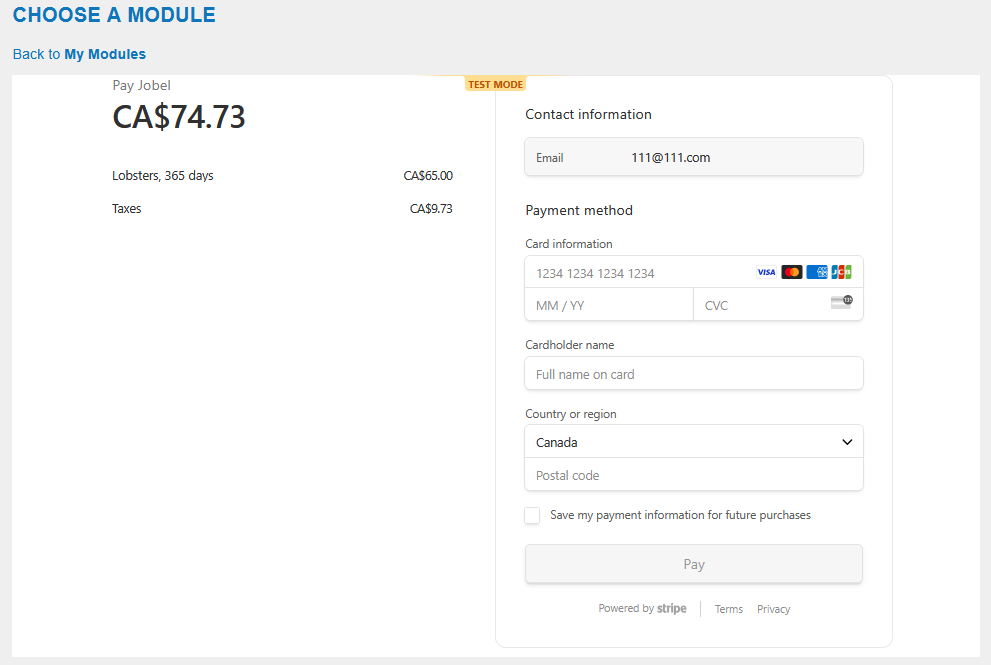
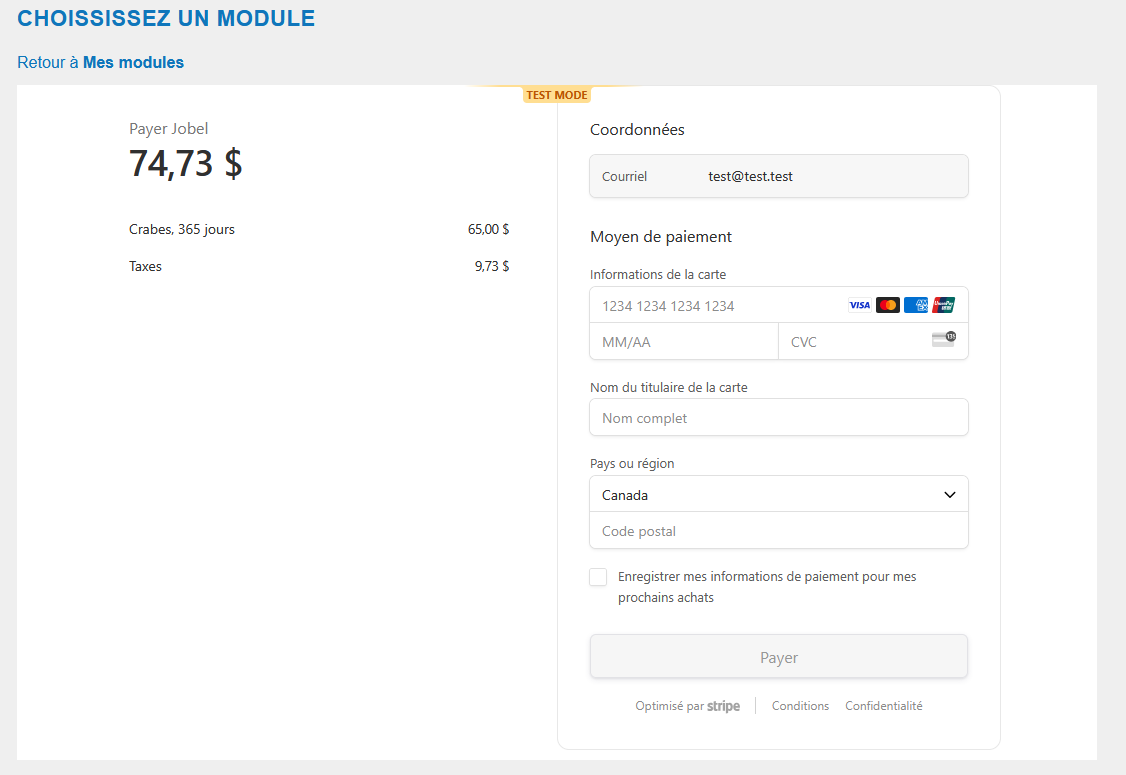
JOBEL Module Prices. The prices of the ordered modules are those in effect on the Website at the time the Order is placed. Unless otherwise stated, they are in Canadian dollars (CAD). Any tax applicable to the Services will be added to the price of the Services and will be due, without this being considered a price change.


 FIELD VALIDATION
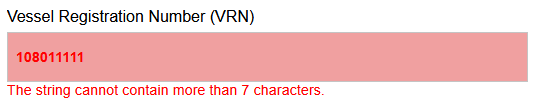

 VALIDATION DES CHAMPS


 ON TABLET OR COMPUTER

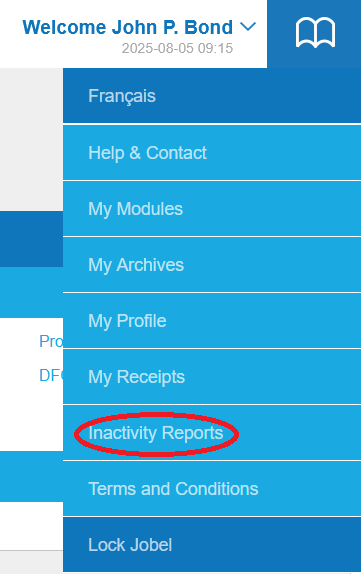
 Français


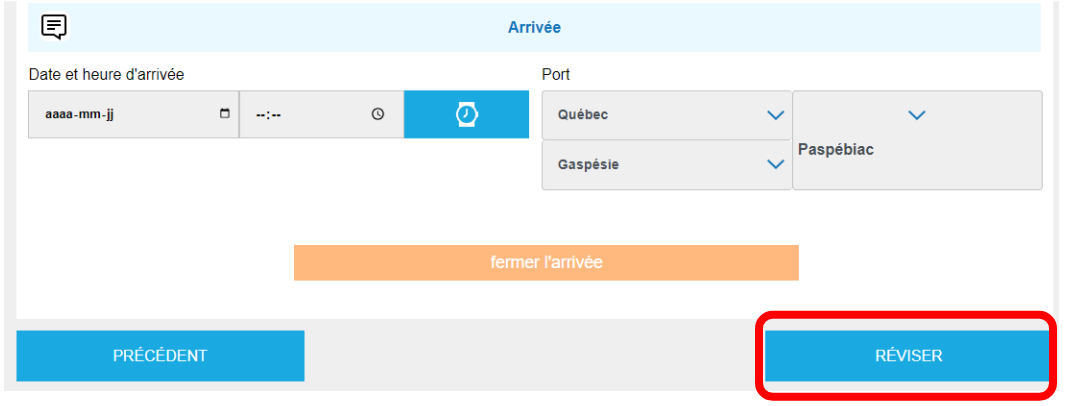
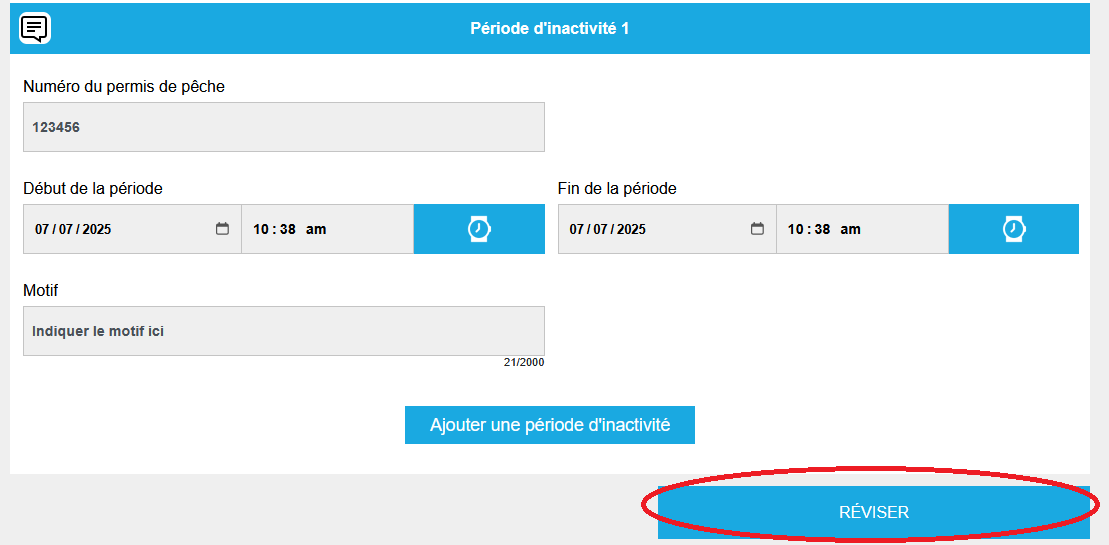
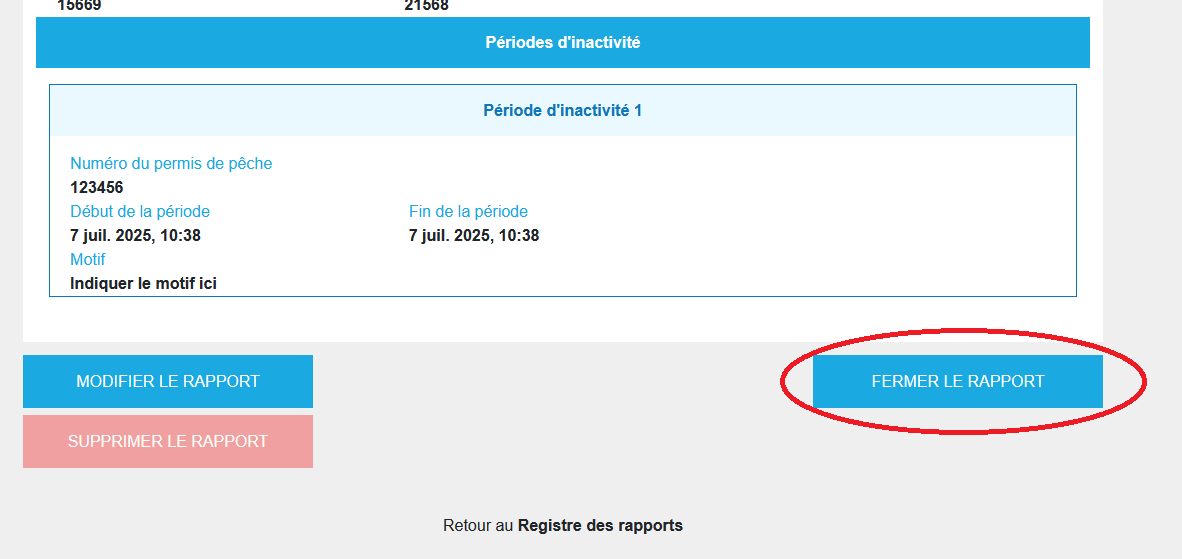
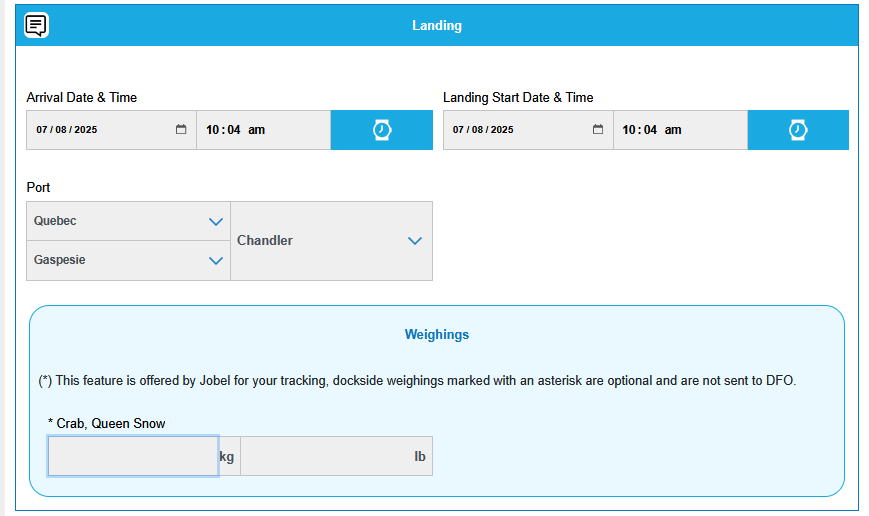
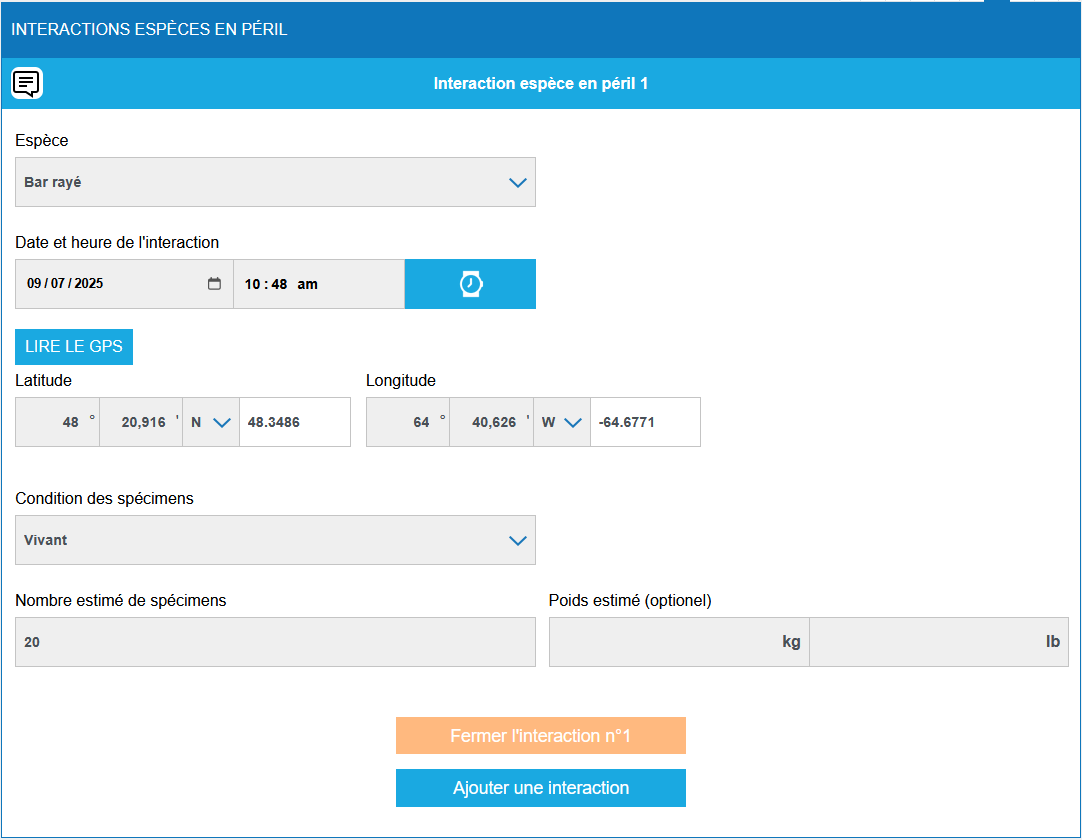
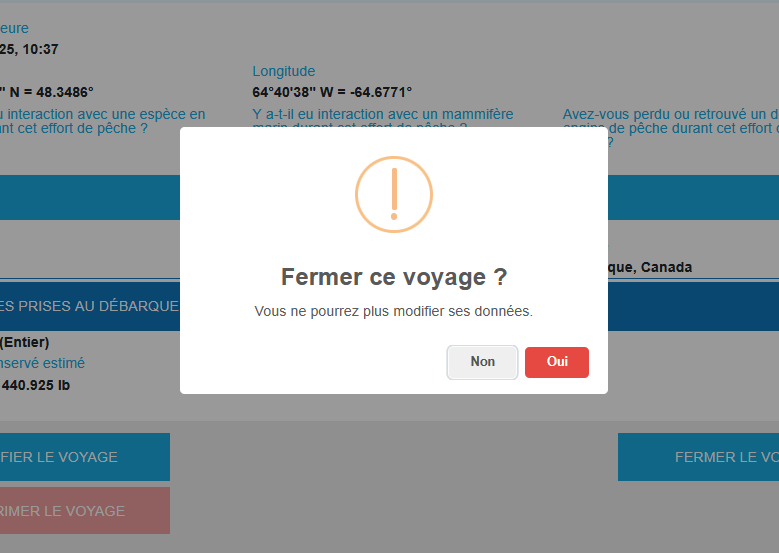
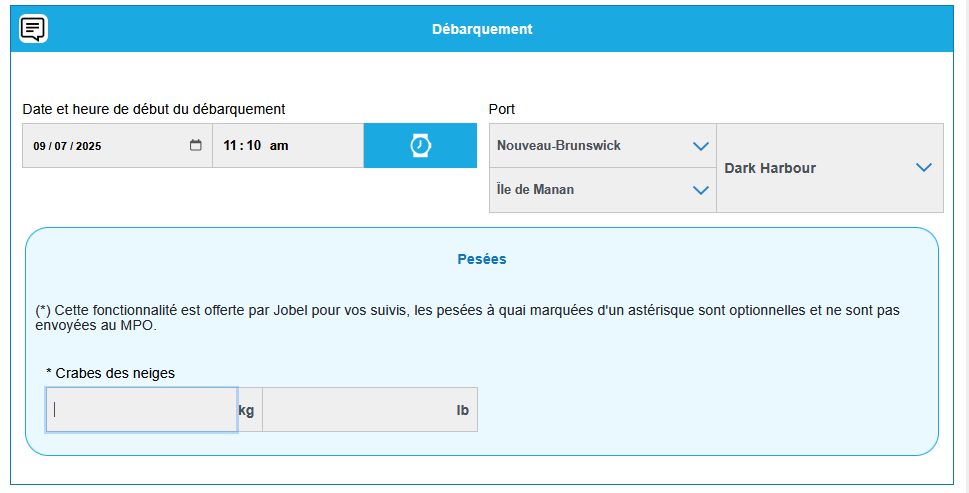
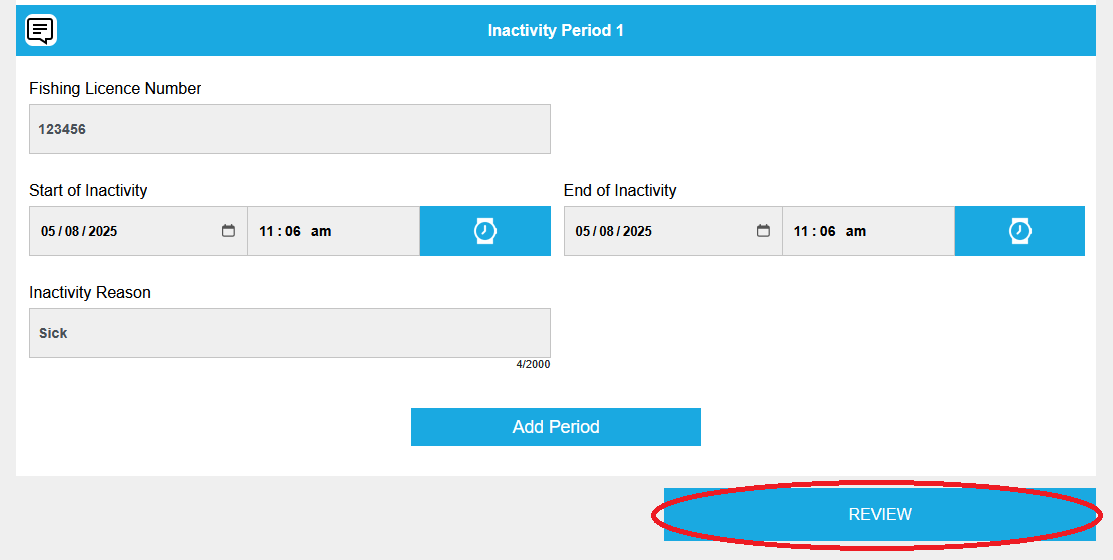 The review page
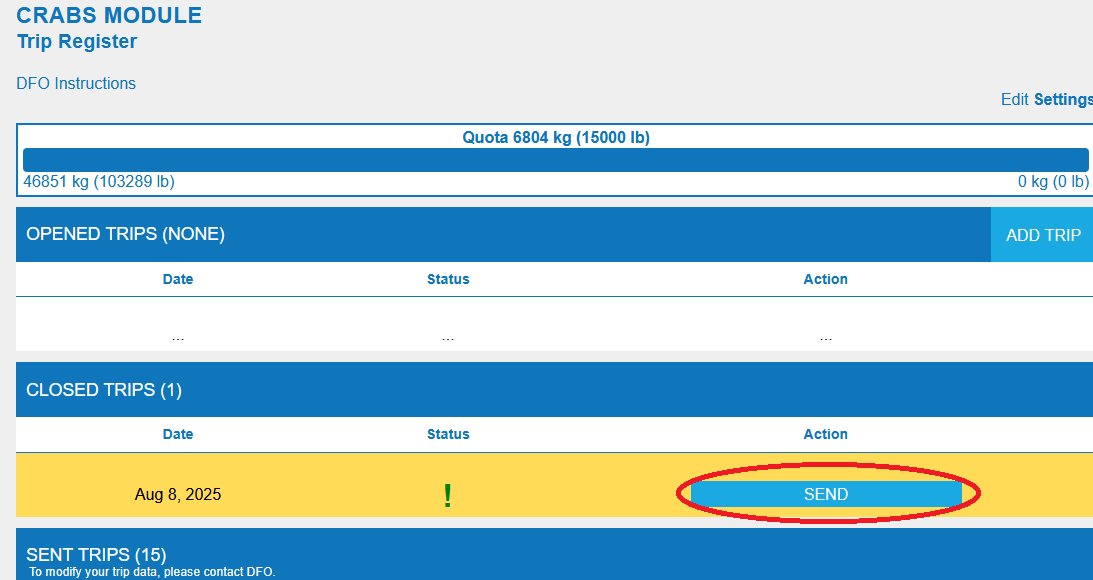
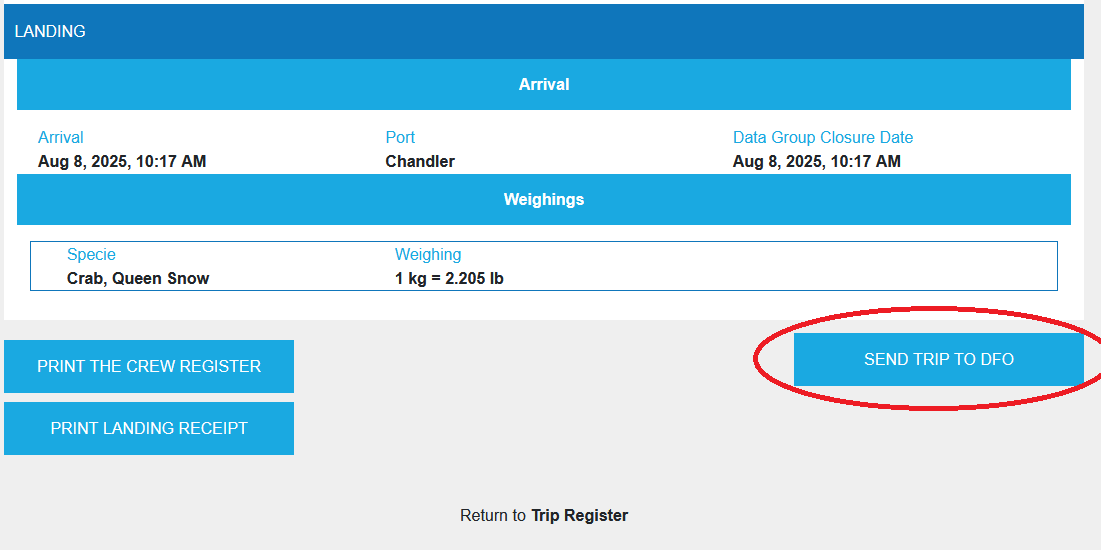
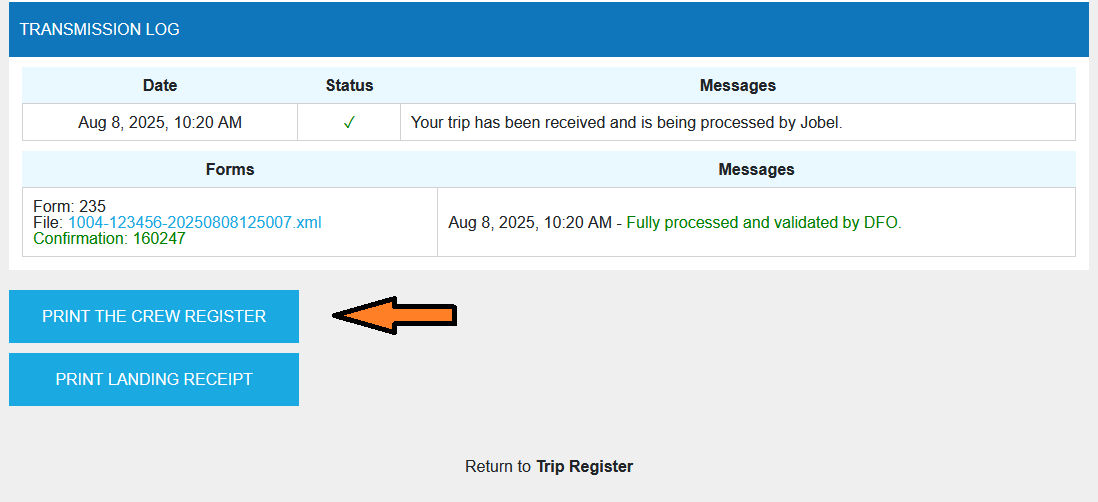
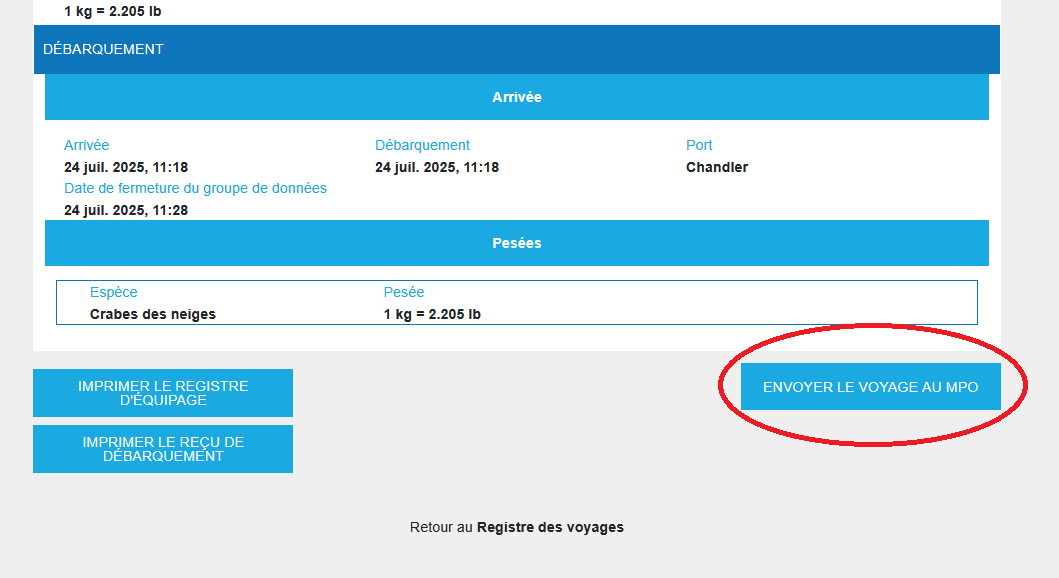
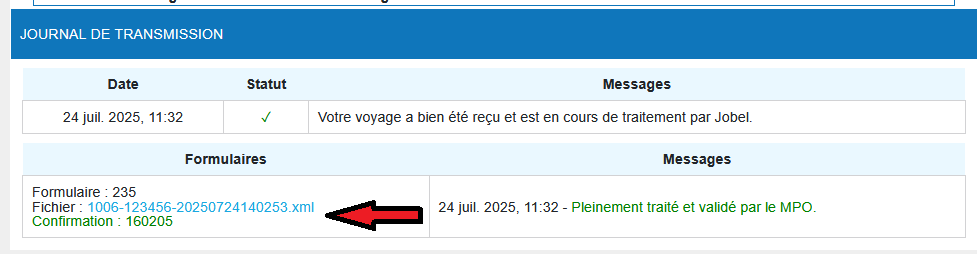
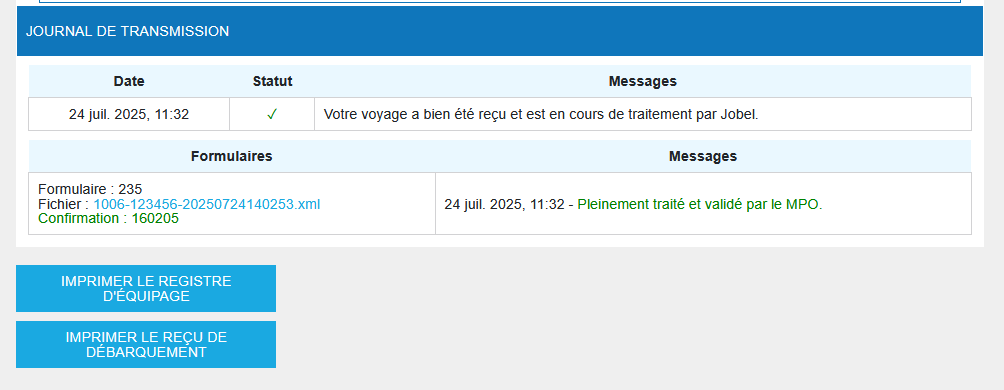
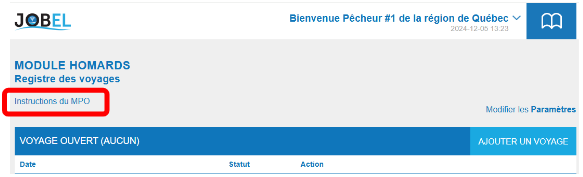
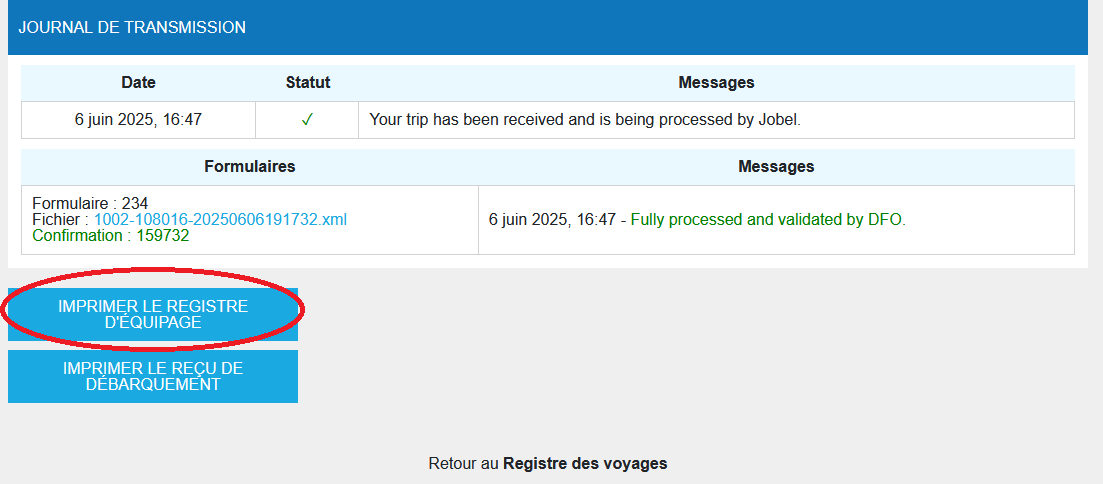
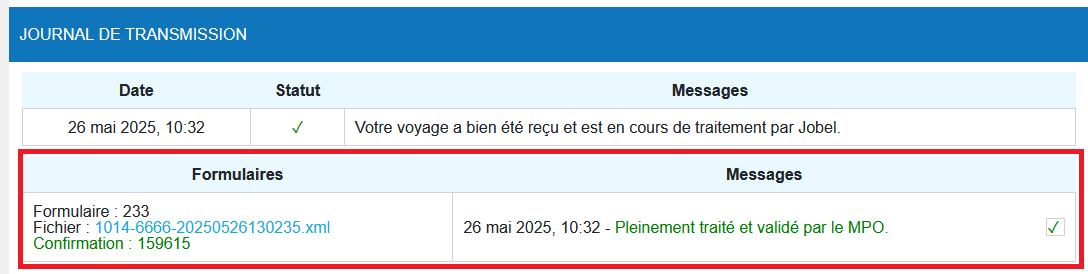
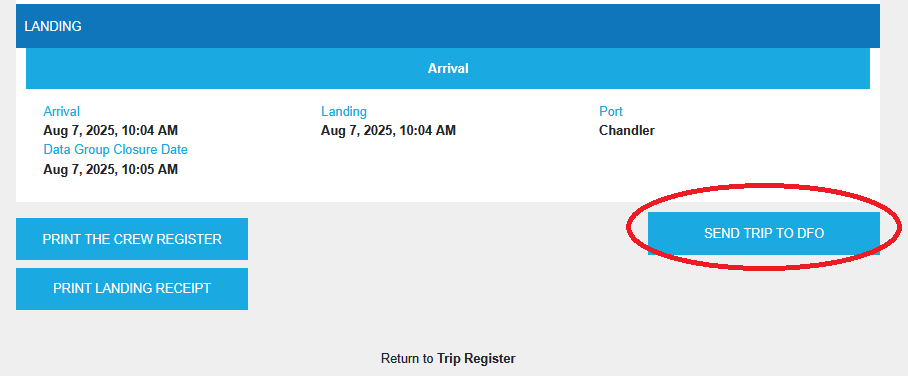
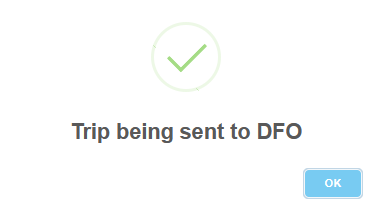
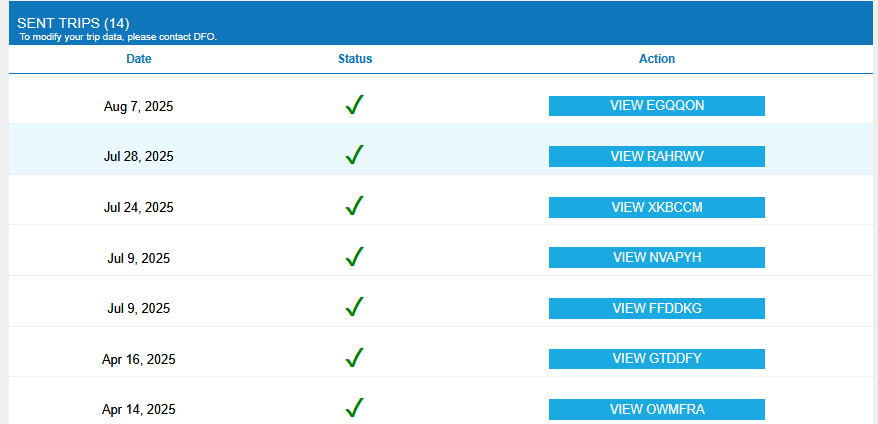
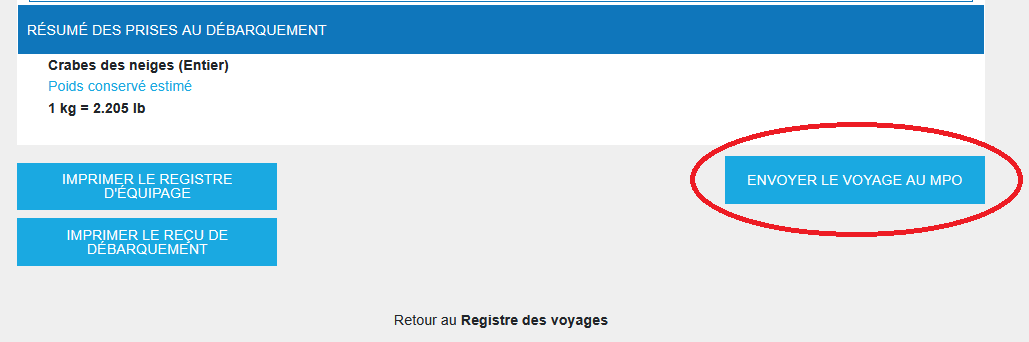
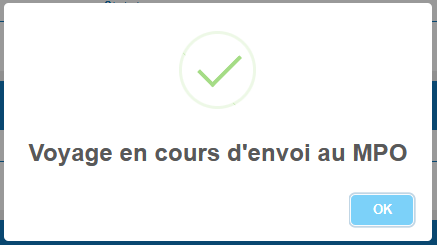
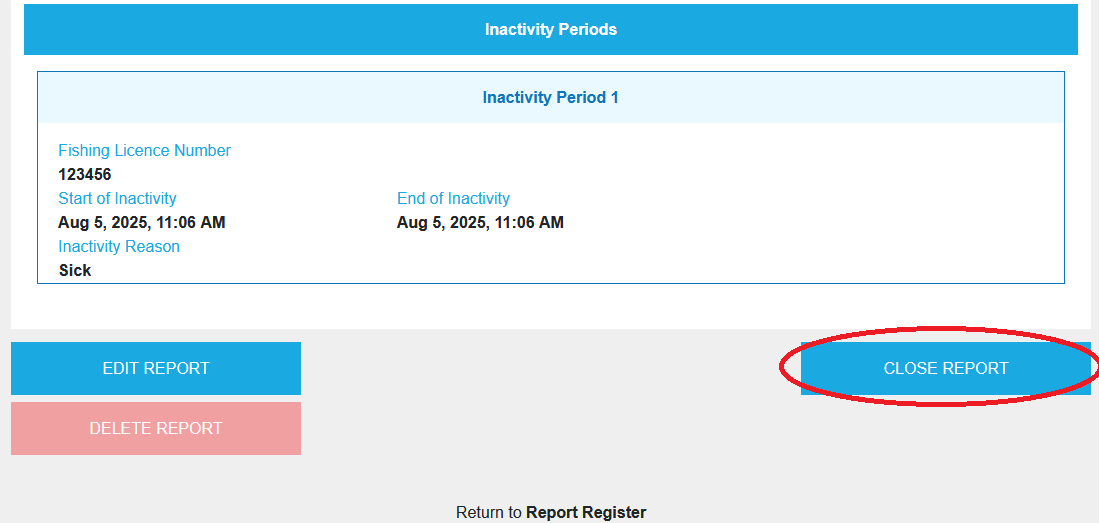 Sending the report to the DFO

 SUR TABLETTE OU ORDINATEUR

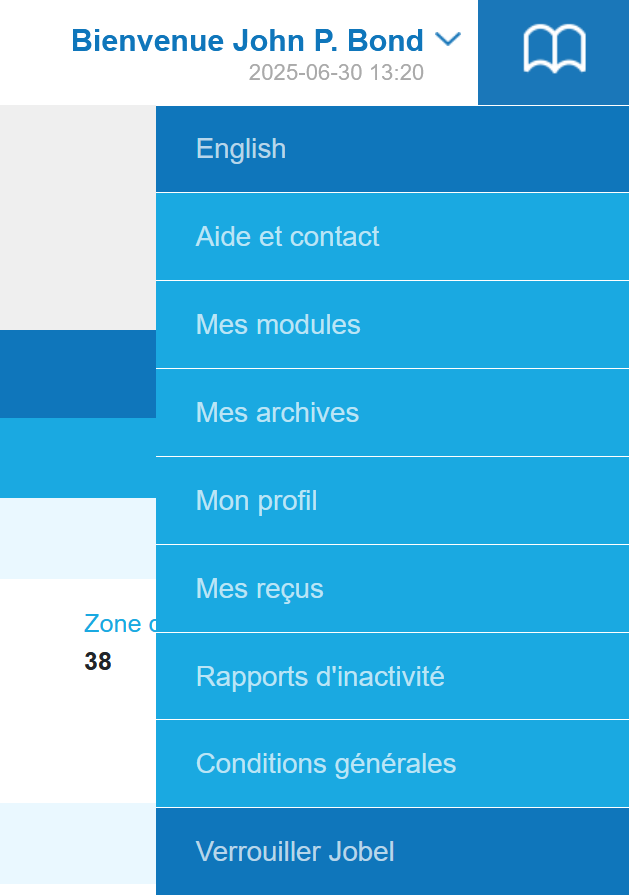 English


 La page de révision
 Envoi du rapport au MPO

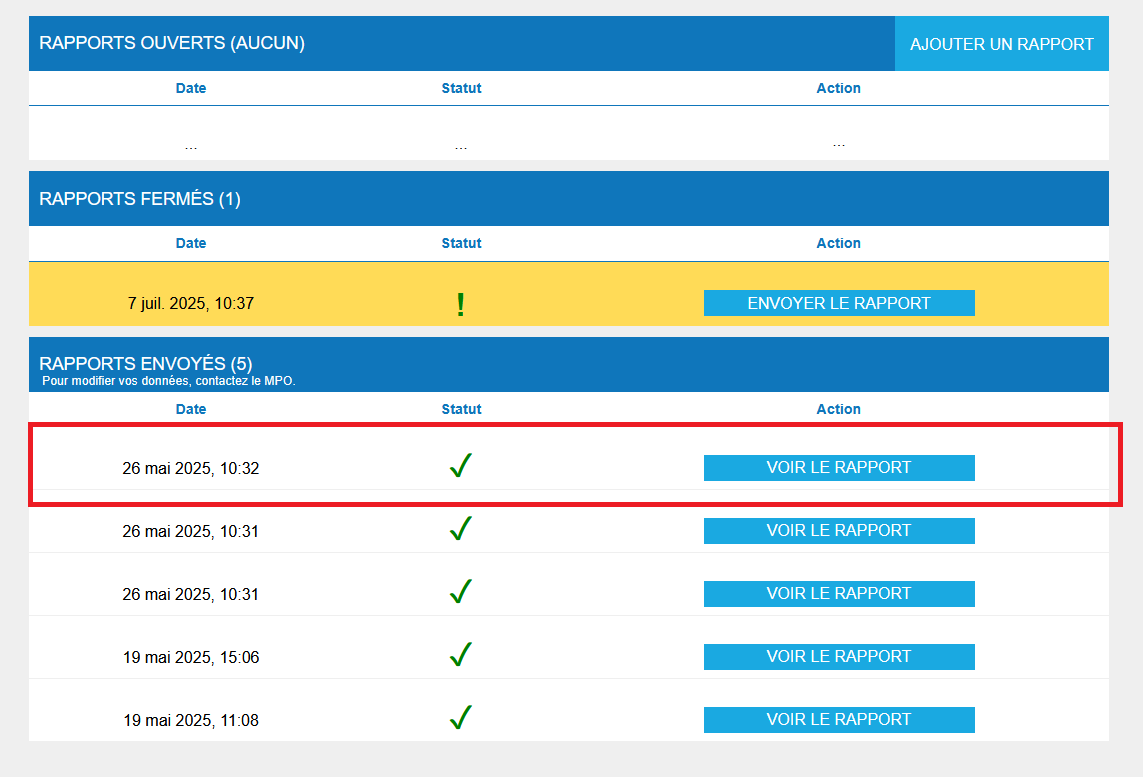
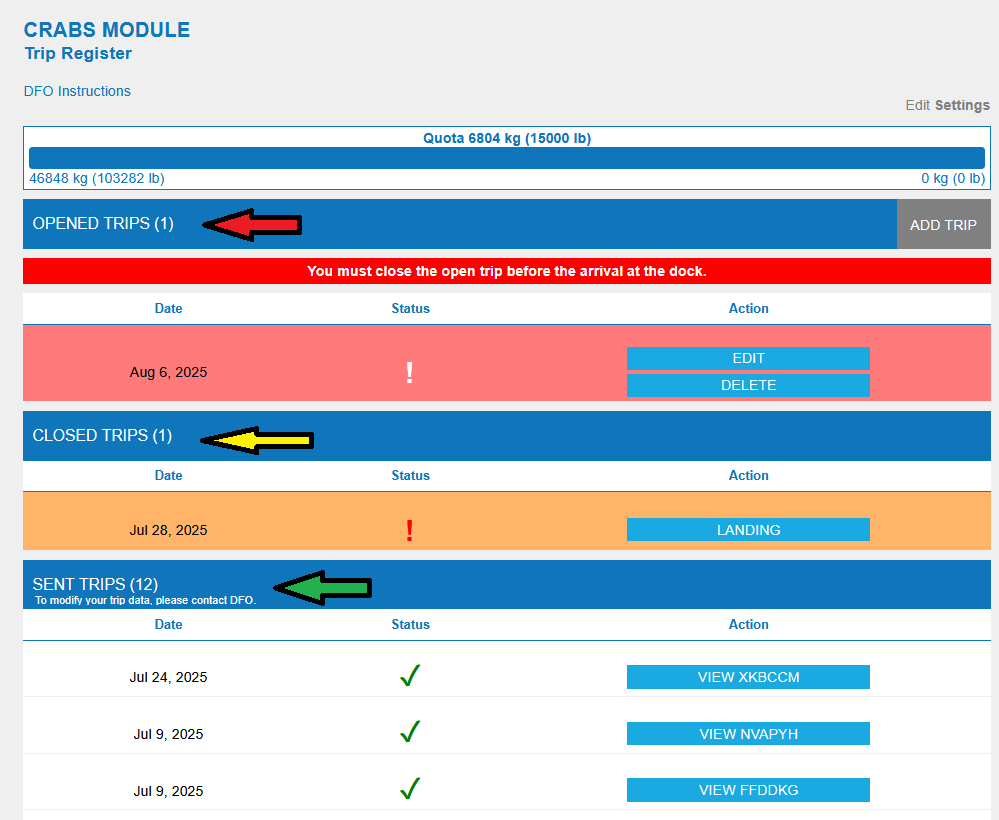


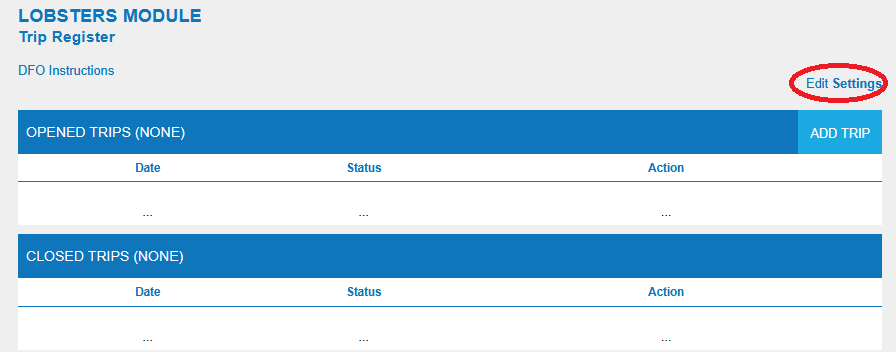
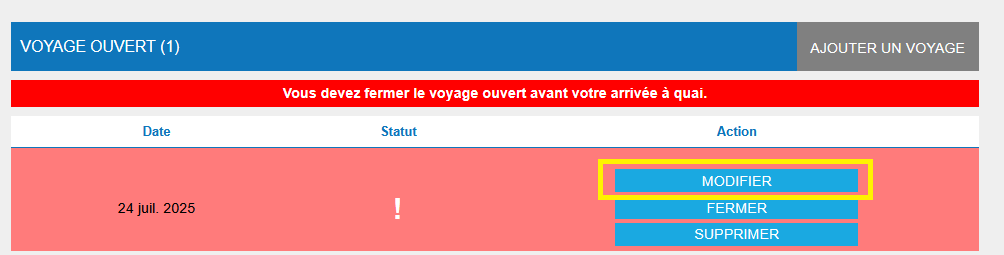
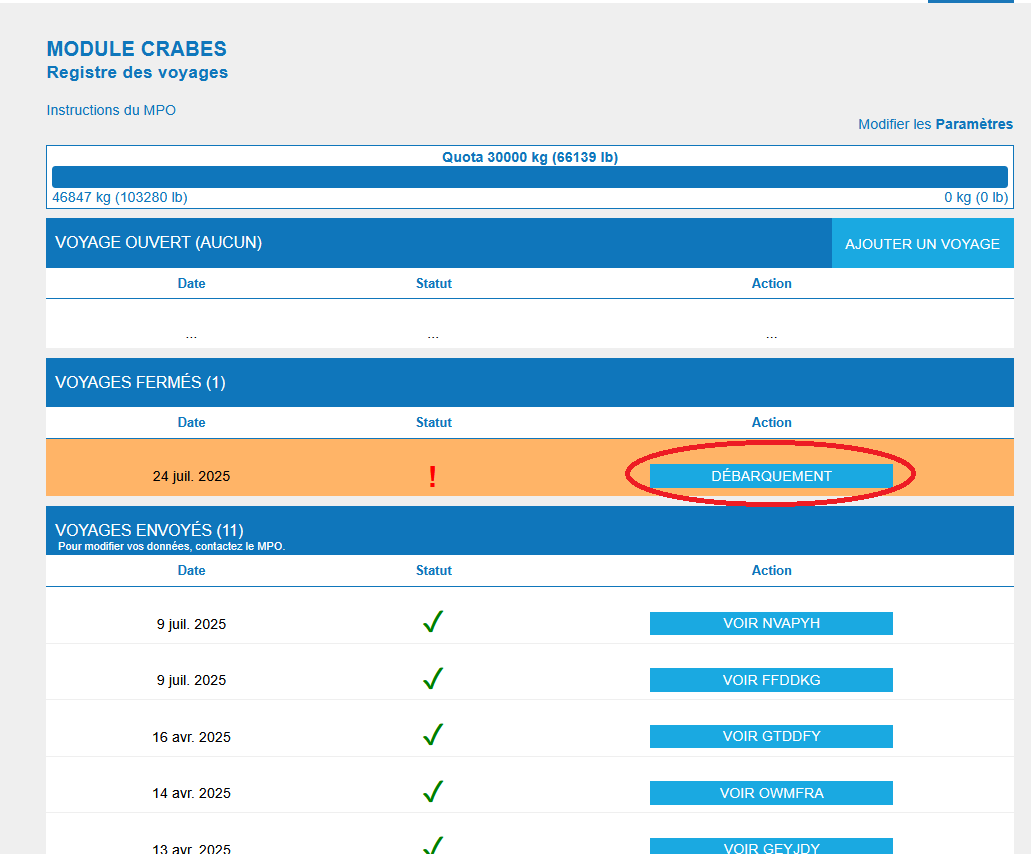
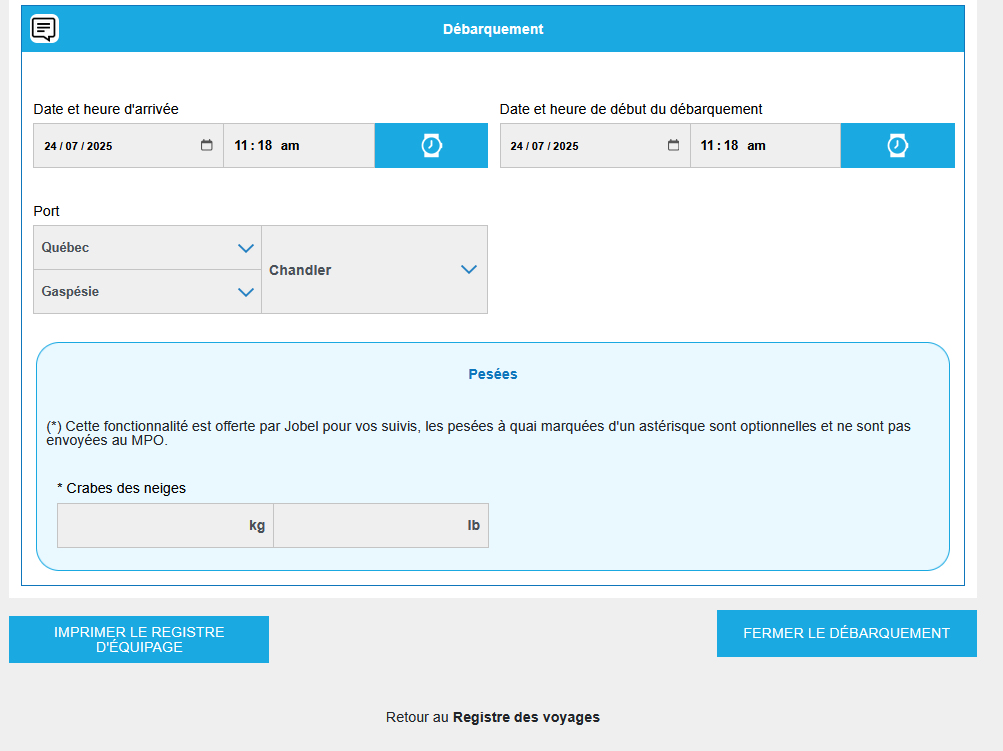
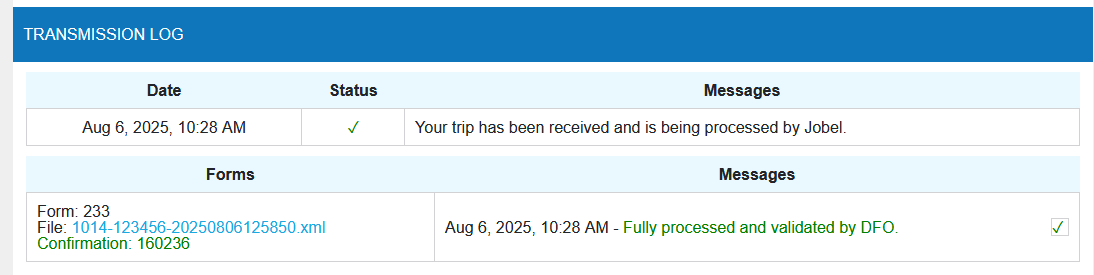
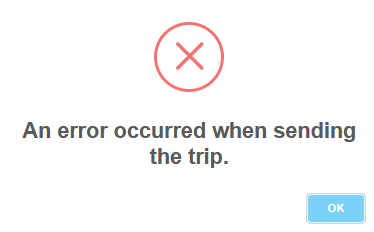 Your trip will still be visible in the Closed Trips table and you can resend it once the network is available.

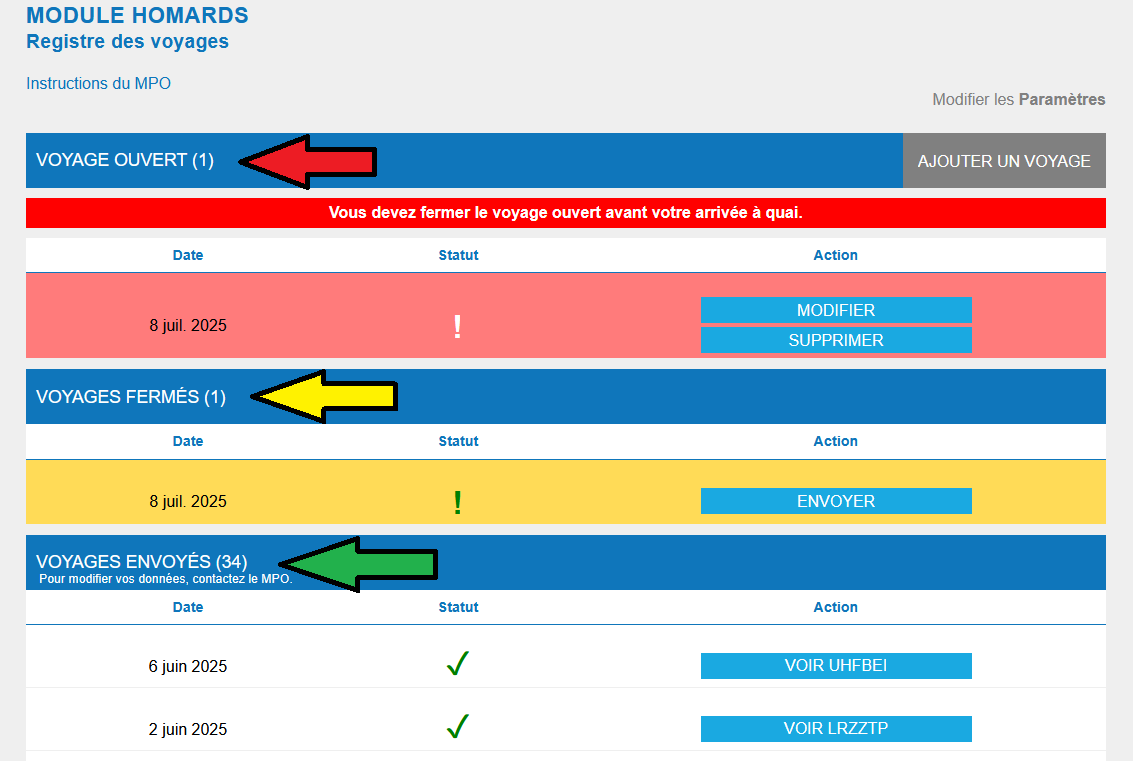


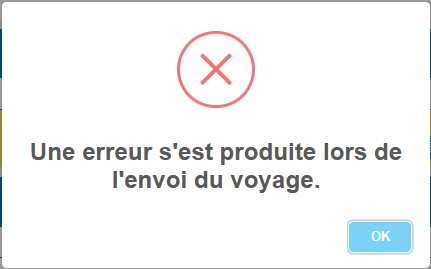 Votre voyage sera toujours visible dans le tableau des voyages fermés et vous pourrez l'envoyer à nouveau une fois que le réseau est disponible.